Hyper-V is a hardware virtualization that lets you create virtual drives, switches or other virtual devices that can be added to the virtual machines. You can run each virtual machine on Hyper-V without having any effect to the host machine because it runs on isolated environment even tough it were running in the same hardware which means, you can do whatever testing you need to do on your virtual machine.
A virtualization is needed to:
- Running an application testing to be use on multiple operating system platform or
application that only can be installed on older version of operating system - Replication of your software or application for easier supports and training
- Operating system experimental to have better understanding on how to using it
- Saving more time rather than re-installing the same things again and again because with
virtualization, you can do backup, export or import the virtual machine to others devices - In terms of costing, creating a virtual machine is really save much rather than invest on
purchasing more devices or hardware
HYPER-V HARDWARE REQUIREMENTSTo run a virtualization, your host machine hardware must support virtualization technology that need to be enabled from BIOS and with higher processor, memory and also more storage space in order to run seamlessly virtual machines but it doesn't always require this high if you are using for normal testing. The following requirement are necessary if you want to run Hyper-V:-
- 64-bit Processor with Second Level Address Translation (SLAT).
- CPU support for VM Monitor Mode Extension (VT-x on Intel CPU's).
- Minimum of 4 GB memory. As virtual machines share memory with the Hyper-V host, you
will need to provide enough memory to handle the expected virtual workload.
Verifying hardware compatibility to run virtualization:
1. Verify Processor Compatibility
- Check your processor model at System Properties or System Information on your computer
- Then verify if the processor supports virtualization here and scroll down to “Advanced
Technologies” sections and look as below:
Additional information on virtualization status
Image Source : Intel
All the above steps are the guide for you to check if your computer is ready for virtualization and it is not necessary to run all these steps to check it. If one of these steps are confirmed virtualization ready then you can enable the Hyper-V.
1. Launch the Hyper-V manager and select your host machine under the Hyper-V manager
5. On the vm windows, follow the instructions to install the operating system till finish.
ENABLE HYPER-V ON WINDOWS 10
Hyper-V can be enabled in various ways but for this guide, we will go the easiest way to do it.
1. Enable Hyper-V using PowerShell
Open up an elevated Windows PowerShell and type or copy below command and paste it into the powershell and press enter to begin
2. Enable Hyper-V via Programs and Features
Hyper-V can be enabled in various ways but for this guide, we will go the easiest way to do it.
1. Enable Hyper-V using PowerShell
Open up an elevated Windows PowerShell and type or copy below command and paste it into the powershell and press enter to begin
Enable-WindowsOptionalFeature -Online -FeatureName Microsoft-Hyper-V -All
2. Enable Hyper-V via Programs and Features
- Right click Windows start menu button and select Apps and Features
- Then select Program and Features under Related settings
- Select Turn Windows features on or off and scroll down to Hyper-V and tick the checkbox
and click OK. Hyper-V will be installed and windows will prompt to reboot upon
completion.
CREATE THE VIRTUAL MACHINE
Note : Please make sure your media installer is ready for installation
1. Launch the Hyper-V manager and select your host machine under the Hyper-V manager
2. Then select New > Virtual Machines on the right at Actions menu
3. Customize your virtual machine depending on your preferences. Below screenshot are just
for guidance on creating the vm:
3. Customize your virtual machine depending on your preferences. Below screenshot are just
for guidance on creating the vm:
Set vm name and specify location or use default location.
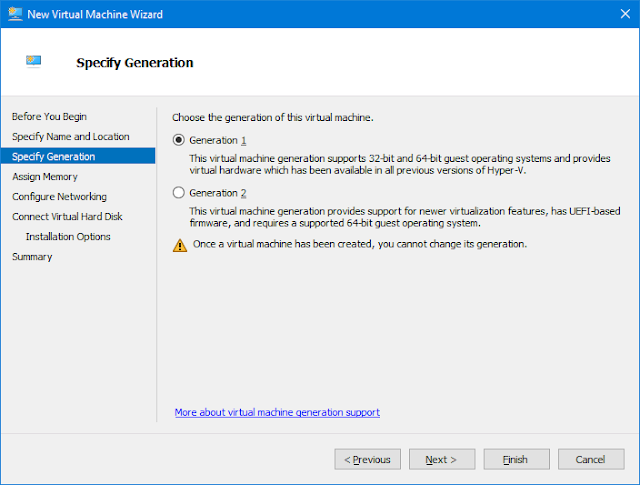
For more information on choosing the Generation, please refer here.
Configure memory needed for the vm
Specify your connection type or use default
Since we create a new vm, select create a virtual hard disk
Select your installation media either on physical drive or in ISO format
Verify your vm summary and click finish to begin vm creation
4. Once complete go-to Hyper-V manager to select your newly created vm than double click on it
and click start on the popup windows to begin the installation of the new vm
Once installation finished, you will have Ubuntu operating system running on top of your Windows 10.
You can create as many vm you like, but without higher processor or memory to run it on concurrent session might be a problem of performance issue. To avoid this, you need to plan properly and adjust your current hardware specification depending on your usage.
You can create as many vm you like, but without higher processor or memory to run it on concurrent session might be a problem of performance issue. To avoid this, you need to plan properly and adjust your current hardware specification depending on your usage.


Post a Comment